How to upload a GoToWebinar event to T4
The following steps outline how to upload a webinar that is listed on GoToWebinar to T4.
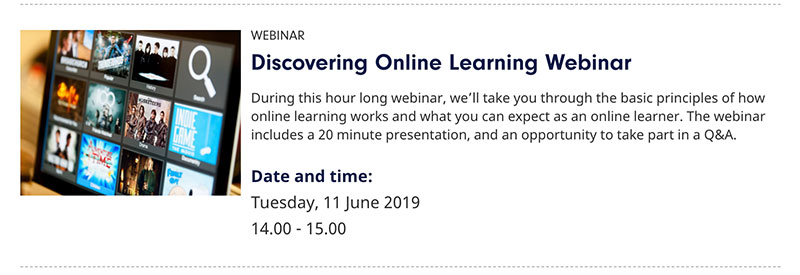
The result will create an event that appears within the central events calendar and looks like a normal event (example screenshot below). However, when the event listing is clicked either from a listing page or from a site search result page the user will be sent straight to the GoToWebinar booking page.
Step-by-step guide
- Create a section within Home » www.derby.ac.uk » Organisation » Events » Latest events or if creating a UDOL webinar within Home » www.derby.ac.uk » Work in Progress » UDOL content » Webinar build area
- Name should follow the format [event] webinar, [month]
- eg Discovering Online Learning Webinar, June. This is important as this will give the section a unique output URI.
- Untick the show in navigation option
- On the Edit rights tab assign access to the appropriate group(s) eg for UDOL webinars assign the UDOL user group with access
- Add a pattern hero
- Name should follow the same pattern as the section name
eg Pattern hero - Discovering Online Learning Webinar, June - The heading is what will pull through to your listing, the date is pulled through separately, so this should follow the format [event] webinar
eg Discovering Online Learning Webinar.
- Name should follow the same pattern as the section name
- Add the section config
- Add your abstract, this should be relevant and unique to the webinar. If there is already a webinar similar to the one you’re creating use an existing content and update to be relevant and unique to your webinar. If there isn’t then you can write your own.
- Add a thumbnail image rectangle, export from ThirdLight using Website imagery – thumbnail rectangle or crop your image to 2000x1500. Pass through TinyJPG and upload to an appropriate folder in the media library. Adding a thumbnail is optional, however it is recommended you take the time to source and add one in.
- Set content type tag to event
- If relevant set the audience eg for a Postgraduate Open Event webinar set the audience to Postgraduate
- If relevant set the location, eg for UDOL set location to University of Derby Online
- If relevant set the subjects(s) eg for UDOL subject specific webinars
- If relevant set the courses eg for UDOL course specific webinars add a comma separated list of program codes like so N400, N401, P162
- Set the date and running until fields
- Set the event type to Webinar
- Set the review date. Once an event is passed the section needs to be archived and taken offline. The review date should be set to the date/time your webinar ends and the content owner to a user who can archive the event. NB currently events archiving is handled centrally but the Digital Team, so set the content owner to the moderator with username digitalsupport. It's important you select the moderator digital support and not the group Digital Support eg

- Add the CTA
- Create sub section called CTA, ensure the show in navigation box is unchecked
- Add a Hero CTA piece of content
- Set the button text to Book your webinar
- Paste the GoToWebinar link for the event in the external link field
- If the content requires moderating by the Digital Team, send a request for moderation to digitalsupport@derby.ac.uk
Important when QAing
When QAing a webinar it's important to ensure the steps in this guide have been followed correctly. For UDOL webinar's in particular as these automatically pull into course pages you should check they have been tagged by subject/course correctly if applicable.
Related articles